How to prevent and block invalid clicks on AdSense on WordPress sites?
AdSense invalid clicks are the result of impressions and clicks caused by traffic generated by robots or spam. A large number of invalid clicks will cause your AdSense account to be suspended.
In this tutorial, we introduce how to prevent WordPress from generating invalid AdSense clicks and help your Google account maintain a good reputation.

What is an invalid AdSense click?
AdSense invalid clicks refer to ad clicks from invalid traffic.
What invalid traffic does Google determine?
- The number of ad impressions and ad clicks generated by the site owner’s browsing
- Repeated ad clicks or impressions from one or more users
- A user manipulated by the site owner accidentally clicked on its ad
- Advertisement display and click realized by the robot automation tool plug-in
Hoping to get advertising revenue from Google, webmasters can only be feasible if they attract real traffic users to view and click on your ads.
However, sometimes traffic will enter your website from low-quality sources. This is a form of robot traffic used to click on display ads.
Has Google AdSense detected invalid clicks?
Yes, Google has a very complete system that can automatically detect all invalid clicks.
Generally, Google will not take any action on the account unless there is a large amount of invalid traffic and clicks.
In the case of low traffic from robots and crawlers, several repeated ad clicks and other errors are common, and Google’s detection system often ignores them.
However, Google will automatically adjust your account income to eliminate spam and fake clicks. These adjustments are made in real time, and may also be made at the end of the month.
The best way to avoid account fines is to prevent invalid traffic from entering your website in the first place. You can also report invalid clicks to the Google Adsense team, but this will not free your account from liability.
How to protect AdSense from invalid clicks
Invalid clicks are a threat to WordPress blogs and can also affect the website ’s ability to make money , especially if there are persistent problems.
There are three steps you can take to maintain the good standing of your Google AdSense account:
- Monitor website traffic and identify any invalid sources
- Ensure that your website’s ad placement complies with AdSense guidelines
- Use AdSense to protect WordPress plugins to block invalid traffic and clicks
Understanding ad traffic and WordPress visitors
The root cause of invalid AdSense clicks is website traffic.
As a WordPress webmaster, you are responsible for website traffic. This is why it is extremely important to understand how people find and use your website.
The easiest way to monitor website traffic and analysis is to use MonsterInsights . This is the best analysis solution for WordPress and has been installed and used by more than 2 million WordPress websites.
In general, you only need to install and use the free version of MonsterInsights to access the most important analysis data. In addition, it is also very necessary to install a Google website statistics code for your website .
After setting up the plugin, you can view the Google Analytics analysis report in the WordPress dashboard. Just go to " Insights »Reports " to quickly understand your traffic.
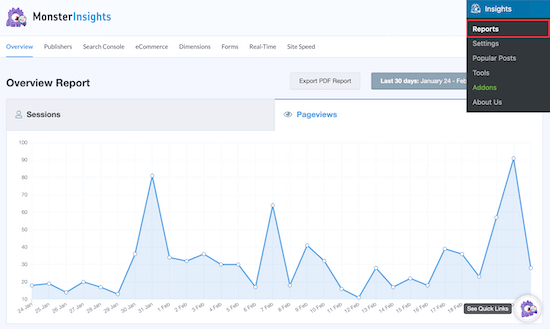
You can compare your Google Analytics data with Google AdSense data to see if any traffic sources are the cause of invalid clicks.
Maybe you find that a low-quality referral website is sending spam traffic to your website?
Or, when you post in a Facebook group, the traffic returning to your website is mainly robot traffic?
Avoid Google ads inducing click behavior
Site visitors may accidentally click on the ad and be judged as invalid clicks.
Suppose that Google ads are too similar to the rest of the content, or that Google ads are in a position that makes your website difficult to use. In this case, your visitors may accidentally click on Google ads.
For example, if you have an ad directly below the drop-down menu, this may cause visitors to accidentally click on the ad.
Another common mistake is to use ad units that look like website content and navigation links. If a user clicks on an ad and thinks they are browsing your website, it may cause an accidental click.
Use WordPress plugins to intercept invalid traffic sources
If your ad settings are correct, but you still receive a warning from Google, then you can also use a WordPress plugin to block invalid traffic sources.
For this, we recommend using the AdSense Invalid Click Protector plugin. The plug-in is highly customizable, and you can intercept traffic and users as needed.
Using this plugin, you can block the entire country/region, set the maximum number of ad clicks per user, block visitors when they reach the ad limit, block IP addresses, and more.
First you need to install the AdSense Invalid Click Protector plugin.
After enabling the plugin, a new navigation option called "AdSense Invalid Click Protector" will be added to the WordPress dashboard.
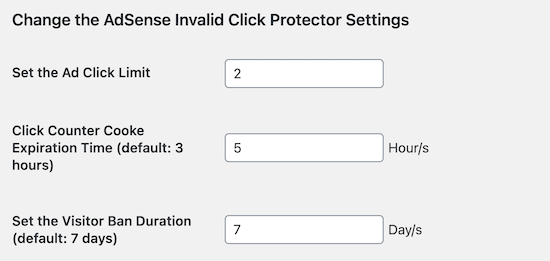
Next, you need to configure the plugin settings. Navigate to Adsense Invalid Click Protector »General Settings .

On this interface, you need to set the conditions for the behavior and traffic type to be intercepted.
We set the "Ad Click Limit" to 2 to restrict visitors from clicking on ads at most two times, and stop ads from showing if the limit is exceeded.
Next, we set the "Click Counter Cookie Expiration Time" to 5 hours. This means that the ad will be shown to the user again after 5 hours.
After that, we will leave the "Visitor Ban Duration" as the default 7 days. The system will show banned users without ads within 7 days.
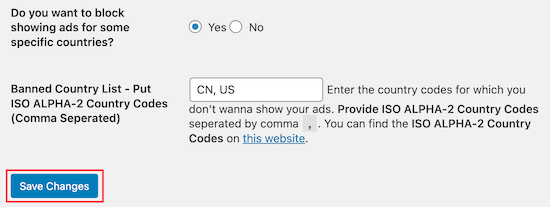
To block display ads for specific countries, set the "Do you want to block showing ads for some specific countries?" checkbox to "Yes". Or, if you don’t want to block a specific country, please leave it as "No".
Then, enter the country code of the country you want to block.
Before exiting the setting interface, make sure to click "Save Changes".
After setting the blocking settings, you need to add the plug-in code to the existing AdSense ad unit.
Where to add the code depends on how the Google AdSense code is added to WordPress.
If you manually add the AdSense code to WordPress, you need to find every instance of the code on your website.
If you are using a plugin to manage ads, please navigate to the plugin and open the AdSense code module. It looks similar to the code below.
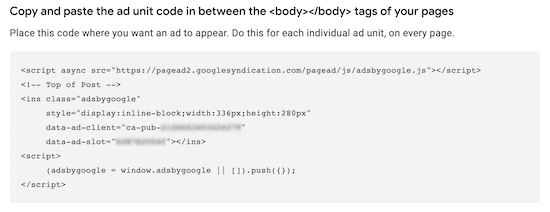
After this is done, you need to add the following code before the AdSense ad code:
Then, encapsulate your ad code in a simple div tag:
The final ad code will look like this:
After adding the plug-in code to Google AdSense ads, the website Google ads will be displayed according to your previous blocking settings.
If you want to use an automated solution, you can use an advanced plugin called WP Advanced Ads Pro , which has built-in click fraud protection.
You can enable click fraud protection directly from the plug-in settings without adding additional code to the website.
We hope that the tutorial can help you understand the rules of Google ads display and clicks on invalid ads, and how to block AdSense ads clicks and display on WordPress sites. enjoy!


0 Comments